Difference between revisions of "project12:W3MSc1TUDG2:MEDIA"
| Line 83: | Line 83: | ||
=='''W3 @ TUD'''== | =='''W3 @ TUD'''== | ||
<br><div style="text-align:justify"> | <br><div style="text-align:justify"> | ||
| − | Before starting the workshop at TUD, we already had a general analysis of the chosen context (Rotterdam river-side promenade/beach), including factors such as wind direction, climate, water tides, pre-existing infrastructure, surrounding urban layout, insects on the area and others. <br><br> Once we had defined different parameters to inform our design, we began the macro form-finding process. Our first attempts were based on the use of lofted-human-adapted curves in Rhino following certain geometric patterns such as circles or archs. However, these were not successful in producing a three dimensional object. After receiving feedback from our tutors we decided to change our approach and decided to generate an object that adapted to the existing context like a landscape (our main reference for this was one of the Hyperbody studio previous projects, a pier/sitting area connecting the land with the water). We used voxels (volume+pixels) to define the scale and distribution of activities in each part of the object and afterwards we used the Rhino T-Splines add-on to replicate and refine this volumetric distribution. To complement the resulting form, we also re-modelled the surroundings to create a seamless merging between the object and the context. The macro scale of this form was further refined by using the human scale generating sitting and lying areas. <br> [[File:Overview_models.png|850px|thumb|center|iterations]]<br> | + | Before starting the workshop at TUD, we already had a general analysis of the chosen context (Rotterdam river-side promenade/beach), including factors such as wind direction, climate, water tides, pre-existing infrastructure, surrounding urban layout, insects on the area and others. <br><br> Once we had defined different parameters to inform our design, we began the macro form-finding process. Our first attempts were based on the use of lofted-human-adapted curves in Rhino following certain geometric patterns such as circles or archs. However, these were not successful in producing a three dimensional object. After receiving feedback from our tutors we decided to change our approach and decided to generate an object that adapted to the existing context like a landscape (our main reference for this was one of the Hyperbody studio previous projects, a pier/sitting area connecting the land with the water). We used voxels (volume+pixels) to define the scale and distribution of activities in each part of the object and afterwards we used the Rhino T-Splines add-on to replicate and refine this volumetric distribution. To complement the resulting form, we also re-modelled the surroundings to create a seamless merging between the object and the context. The macro scale of this form was further refined by using the human scale generating sitting and lying areas. |
| + | |||
| + | <br> [[File:Overview_models.png|850px|thumb|center|iterations]]<br> | ||
| + | |||
| + | |||
[[File:voxels.jpg|850px|thumb|center|voxels]] <br><br> Consequently we selected an extract of the object slicing it out through the isocurves, making it coherent with the general form’s fluidity. We selected the highlighted segment because it included areas for both humans and insects plus an interesting geometry. <br><br> Afterwards we applied grasshopper scripts on the extracted segment to develop the micro scale of porosity, taking into consideration the following references. The distribution and scale of porosity was based upon attractor points according to the mapping of activities (both for insects and humans) and to the compression and tension strength lines. <br><br> Finally, we researched on different methods of both production and assembly, both for the prototype and for the materialisation of the 1:1 object as a whole. We found several interesting examples and references but due to the time limits of the workshop, we assembled the first 1:20 3D printed prototype in a 3 parts ensemble connected by basic positive-negative cylinders. We also 3D printed a 1:200 model of the general object with the Ultimaker machine.</div> | [[File:voxels.jpg|850px|thumb|center|voxels]] <br><br> Consequently we selected an extract of the object slicing it out through the isocurves, making it coherent with the general form’s fluidity. We selected the highlighted segment because it included areas for both humans and insects plus an interesting geometry. <br><br> Afterwards we applied grasshopper scripts on the extracted segment to develop the micro scale of porosity, taking into consideration the following references. The distribution and scale of porosity was based upon attractor points according to the mapping of activities (both for insects and humans) and to the compression and tension strength lines. <br><br> Finally, we researched on different methods of both production and assembly, both for the prototype and for the materialisation of the 1:1 object as a whole. We found several interesting examples and references but due to the time limits of the workshop, we assembled the first 1:20 3D printed prototype in a 3 parts ensemble connected by basic positive-negative cylinders. We also 3D printed a 1:200 model of the general object with the Ultimaker machine.</div> | ||
<br><br><br> | <br><br><br> | ||
Revision as of 11:35, 20 December 2017
MSc1 TUD: G2
MEDIA STUDIES
- D2RP&O RESEARCH
- LECTURE 1: ENVIRONMENTAL INTERACTION
- LECTURE 2: 3D PRINTING WITH PLASTIC
- LECTURE 2: 3D PRINTING WITH PLASTIC
- W2 @ DIA
- W3 @ TUD
- PROJECTION AND FUTURE GOALS
D2RP&O RESEARCH
LECTURE 1: ENVIRONMENTAL INTERACTION
LECTURE 2: 3D PRINTING WITH PLASTIC
LECTURE 3: JELLE FERINGA
It was also interesting to hear about his critical views of today’s technological advances. Jelle valued the way robots can increase the value of primal products whilst also commenting on how some projects are over-complicated just for the sake of trying new methods of production. Could the future of 3D printing and Robotic Production merge into the sector of pre-fabricated elements or continue expanding into different sectors of construction?
In terms of the contribution to our own project, we were particularly inspired by the assembly methods in the domed-arc, because we’re interested in finding a similar method of assembly for our urban furniture. We were also compelled by the apparently endless possibilities that these technologies offer, specially in terms of production. It is necessary to consider the methods of materialisation without letting that limit what you design because the boundaries can always be pushed further, as we saw on this lecture.
W2 @ DIA
W3 @ TUD
Before starting the workshop at TUD, we already had a general analysis of the chosen context (Rotterdam river-side promenade/beach), including factors such as wind direction, climate, water tides, pre-existing infrastructure, surrounding urban layout, insects on the area and others.
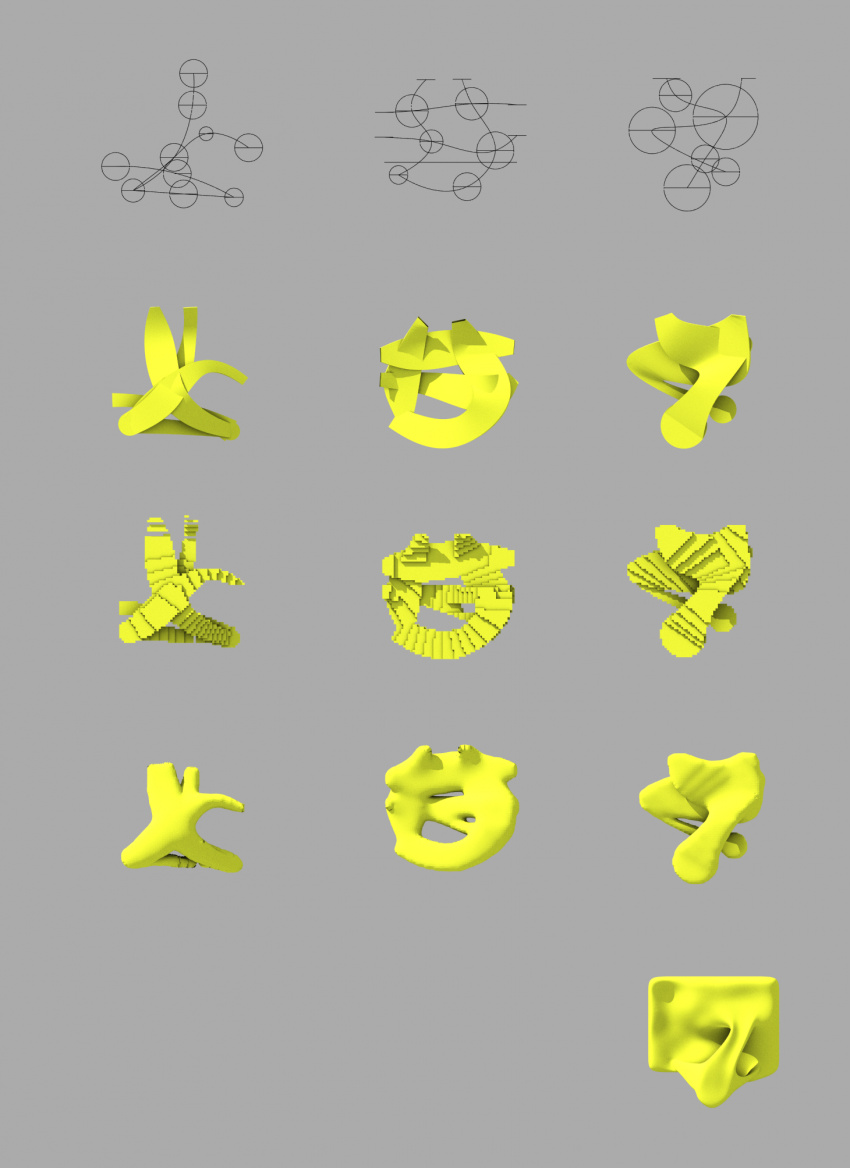
Once we had defined different parameters to inform our design, we began the macro form-finding process. Our first attempts were based on the use of lofted-human-adapted curves in Rhino following certain geometric patterns such as circles or archs. However, these were not successful in producing a three dimensional object. After receiving feedback from our tutors we decided to change our approach and decided to generate an object that adapted to the existing context like a landscape (our main reference for this was one of the Hyperbody studio previous projects, a pier/sitting area connecting the land with the water). We used voxels (volume+pixels) to define the scale and distribution of activities in each part of the object and afterwards we used the Rhino T-Splines add-on to replicate and refine this volumetric distribution. To complement the resulting form, we also re-modelled the surroundings to create a seamless merging between the object and the context. The macro scale of this form was further refined by using the human scale generating sitting and lying areas.
Consequently we selected an extract of the object slicing it out through the isocurves, making it coherent with the general form’s fluidity. We selected the highlighted segment because it included areas for both humans and insects plus an interesting geometry.
Afterwards we applied grasshopper scripts on the extracted segment to develop the micro scale of porosity, taking into consideration the following references. The distribution and scale of porosity was based upon attractor points according to the mapping of activities (both for insects and humans) and to the compression and tension strength lines.
Finally, we researched on different methods of both production and assembly, both for the prototype and for the materialisation of the 1:1 object as a whole. We found several interesting examples and references but due to the time limits of the workshop, we assembled the first 1:20 3D printed prototype in a 3 parts ensemble connected by basic positive-negative cylinders. We also 3D printed a 1:200 model of the general object with the Ultimaker machine.


